Best Free Orca Slicer Printer Selection | Great 3D Prints
Selecting the correct printer in Orca Slicer is one of the first steps to achieving great 3D prints. This free slicing software is favored by hobbyists and professionals because it’s compatible with many different printers.
If you choose your printer properly, Orca Slicer generates the right instructions (G-code) for your machine. This leads to better print quality and a lower failure rate. Whether you have a Bambu Lab, Creality Ender, Prusa, or another FDM printer, this setup guide will help you get reliable results.
In this article, you’ll learn:
- How to choose the right printer from hundreds of built-in choices
- Methods for setting up custom options for modified machines
- How to connect your printer using Wi-Fi (Device Tab)
- Solutions for common setup problems
Let’s begin with the basics of choosing a printer.
Understanding Printer Selection in Orca Slicer
What Is Printer Selection?
Printer selection means telling Orca Slicer which 3D printer you have. The software needs your printer’s bed size, nozzle diameter, and other basics. With this info, Orca Slicer creates correct movement commands and limits.
Think of it like selecting the right paper size in a word processor: choose the wrong size and the print won’t fit. Same logic for 3D printing.
Why Correct Printer Selection Matters
Wrong settings can cause many issues:
- Print size: If your profile says 256×256 mm but your real bed is 220×220 mm, your part may not fit or could crash.
- Extrusion issues: The nozzle size setting affects how much plastic is pushed. Wrong values = over/under-extrusion.
- Temperature: Different printers and materials need different temps. Your profile should match your machine’s capability.
- Speed: If speeds/accelerations are too aggressive, motors can skip steps and parts will fail.
Dial these in early and you’ll save time and filament.
Out-of-the-Box Printer Profiles in Orca Slicer
Overview of the Built-in Database
Orca Slicer includes many pre-configured profiles for well over a hundred popular FDM printers. These are maintained by the developers and the community (via GitHub), so you can start printing without guessing every setting.
Each profile typically includes:
- Print bed dimensions
- Recommended speeds
- Temperature ranges for common materials
- Model-specific features (“bells and whistles”)
Supported Printer Brands (Examples)
Bambu Lab: A1, A1 Mini, X1 Carbon, P1P, P1S
Creality: Ender-3 family (V2, S1, Neo), CR-10 series, K1/K1 Max, Ender-5 S1
Prusa: MK3, MK4, Mini+, XL (tool-changer)
Other Popular: Elegoo (Neptune), Voron (DIY), VzBot (speed), RatRig (V-Core), etc.
Important: Orca Slicer is for FDM/FFF printers (filament). It does not work for resin printers. For resin, use Chitubox or Lychee.
Benefits of Pre-Made Profiles
- Time saver: Start printing in minutes.
- Tested configs: Community-validated settings work well as a baseline.
- Material presets: Good starting points for PLA (190–220 °C), PETG (230–250 °C), ABS (240–260 °C), TPU, etc.
- Beginner-friendly: You don’t need to understand every parameter on day one.
Step-by-Step Guide: Selecting Your Printer
Initial Setup (First Launch)
- Download & Install: Get the latest Orca Slicer for Windows/Mac/Linux from the official GitHub.
- Initial Launch: A setup wizard will appear.
- Locate Your Printer: Use the dropdown (or search) by manufacturer/model.
- Choose Exact Model: Pick the exact variant (e.g., “Ender-3 V2,” not just “Ender-3”).
- Select Nozzle Size: Most printers use 0.4 mm; other common sizes are 0.2, 0.6, 0.8 mm. Match your actual nozzle.
- Verify Settings: Confirm bed size (X, Y) and max Z height.
- Save & Finish: Click Save/Finish. Your printer now appears in the top printer dropdown.
Switching Between Printers
Have multiple printers?
- Open the top toolbar → printer dropdown → choose the other printer.
- Orca Slicer will load that printer’s settings.
Creating Custom Printer Profiles
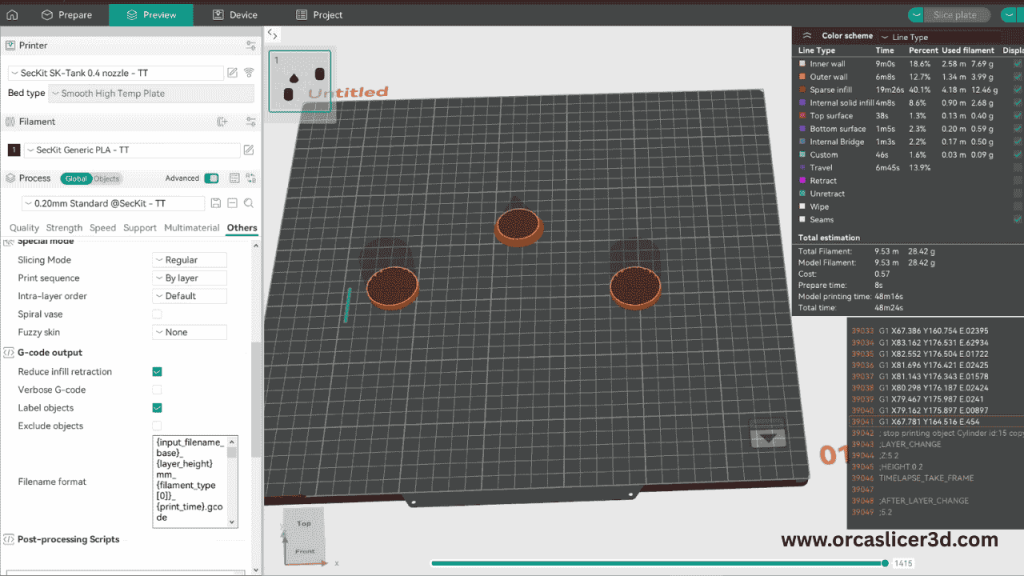
When You Need Custom Settings
Create a custom profile if:
- Your printer isn’t in the list (new/less common models).
- You modified your printer (direct drive, bigger bed, hotter hotend, different motion system).
- You built a DIY printer.
- You use uncommon nozzle or filament diameter.
Information to Gather First
- Build volume: X (left–right), Y (front–back), Z (height). Note: printable area may be smaller than the bed.
- Nozzle size: Check markings; confirm if needed.
- Filament diameter: Most use 1.75 mm; some older/special use 2.85 mm.
- Firmware type: Marlin, Klipper, or RepRap (Duet). Check printer docs/screen.
- Max speeds/temps: Conservative starting speeds; note hotend/bed limits.
Creating Your Profile (Editor Flow)
- Open Printer Settings → Add New Printer/Custom Profile.
- Name it clearly: e.g.,
Custom_CoreXY_0.4mmorModified_Ender3_DirectDrive. - Input measurements: Bed X/Y/Z, nozzle, filament diameter, limits.
- Start/End G-code: Add your firmware-appropriate sequences (home, prime, cool-down, park).
- Save file name: Use a meaningful format like
Brand_Model_Details.json(e.g.,Custom_Printer_V2_0.6nozzle.json).
Testing Your New Profile
- Calibration cube (20 mm): Measure all sides; adjust if needed.
- Temperature tower: Find the best temp for your filament.
- Retraction test: Reduce stringing.
- First layer test: Good adhesion without being squished.
Use these results to make small tweaks.
Importing Printer Profiles from Others
First Downlod File Form Google Drive: Click Here
Where to Find Profiles
- Official GitHub (issues/discussions)
- Reddit/Discord communities
- Facebook groups and forums
- Manufacturer pages for certain models
Always prefer profiles from credible sources with positive feedback.
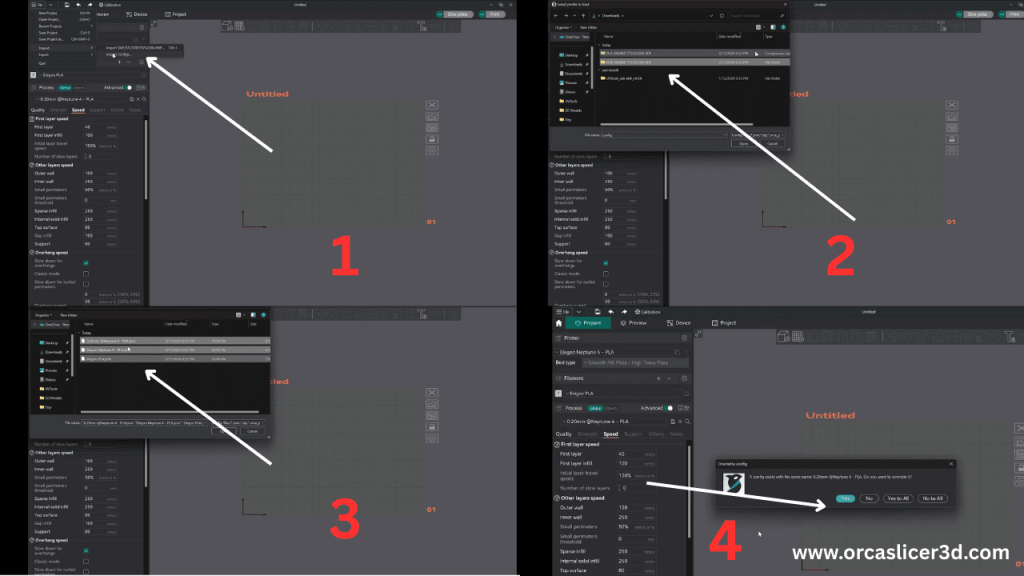
How to Import
- Download the .json profile.
- In Orca, go to File → Import → Import Configs.
- Select the file and confirm.
- Check that the profile appears in your printer list.
Common Import Problems (Fixes)
- “0 files imported”: JSON formatting error, wrong Orca version, or wrong file extension.
- Profile not appearing: Restart Orca; try manual copy to the config directory.
- General fixes: Ensure it’s
.json, check syntax, update Orca to latest.
Network Printing with Device Tab
What Is the Device Tab?
The Device Tab lets you send prints over Wi-Fi or Ethernet—no SD card or USB needed.
Works with:
- OctoPrint (popular print server)
- Klipper with Mainsail/Fluidd
- Bambu Lab printers (LAN/dev-mode)
Note: Orca Slicer has no built-in cloud. For remote printing from anywhere, use a third-party service like Obico.
Setup: Klipper (Mainsail/Fluidd)
- Find the printer’s IP address (screen, router, docs).
- Open Orca Settings → Devices/Network.
- Add Host: Host type Octo/Klipper → enter IP (e.g.,
http://192.168.1.xxx). - Test the connection → Save.
- Open Device Tab to view the interface.
Setup: OctoPrint
- Confirm OctoPrint is reachable in your browser.
- Copy the API key from OctoPrint settings.
- In Orca, paste the IP + API key in Device settings.
- Test and Save.
Device Tab Features (Narrative)
Once connected, you can see your printer’s live status, monitor real-time temperatures, upload G-code directly, and start prints with one click. As the job runs, watch progress updates inside Orca. If a webcam is set up, you can view a live feed to catch issues early.
Remote Printing with Obico
Obico enables full remote control: start/monitor prints from anywhere, get AI-based failure detection alerts, and keep cloud history.
Basic steps: create an Obico account → install Obico on your OctoPrint/Klipper host → link your printer → enable desired features (alerts, AI, etc.).
Advanced Settings (Quick Primer)
Firmware-Specific Options
- Klipper: Pressure Advance (sharper corners), Input Shaper (reduces ringing), custom macros.
- Marlin: Linear Advance (similar to PA), Junction Deviation for smoother motion.
Safety: Thermal runaway protection is firmware-level (not a slicer feature). Ensure it’s enabled on your printer.
Multi-Material Printing (If Applicable)
- Add tool-change commands.
- Configure purge/prime towers for clean color changes.
Bed Leveling
- Manual: Paper/feeler gauge.
- ABL (BLTouch/CR Touch): Set probe offsets; use mesh leveling.
Optimizing Print Settings
Layer Height (for 0.4 mm nozzle)
- Fine detail: 0.08–0.12 mm (slowest)
- Standard: 0.16–0.20 mm (best balance)
- Fast: 0.28–0.32 mm (rougher finish)
Rule: use ~25–75% of your nozzle diameter.
Print Speeds (Starting Points)
- Outer walls: 30–50 mm/s
- Inner walls: 50–80 mm/s
- Infill: 80–150 mm/s
- First layer: 20–30 mm/s
Temperature Guidelines (Typical)
- PLA: 190–220 °C nozzle, 50–60 °C bed
- PETG: 230–250 °C nozzle, 70–80 °C bed
- ABS: 240–260 °C nozzle, 90–110 °C bed
- TPU: 220–240 °C nozzle, 40–60 °C bed
Start with manufacturer recommendations and tune.
Troubleshooting Common Problems
Printer Not in the List
- Update Orca Slicer
- Check new/related profiles on GitHub
- Pick a close family model
- Create a custom profile
Connection Issues
Network:
- Ensure PC and printer are on the same Wi-Fi
- Check firewall/router rules
- Reboot router; verify the printer IP didn’t change
USB:
- Try a different cable/port
- Install drivers (Windows)
- Make sure the printer is powered on
Import Failures
- Verify .json extension and correct Orca version
- Try manual copy into the config folder
- Fix any obvious JSON syntax errors
Wrong G-code Output
- Confirm the correct printer is selected
- Check bed size and nozzle in the profile
- Confirm firmware type matches your machine
- Slice a small test and observe
Also Read: Orca Slicer Not Working
Profile Backup and Sharing
Backing Up Profiles
Export: Configuration → Export Configs → select printer/filament/print settings → save safely.
Best practices:
- Back up before major updates
- Keep a copy in cloud storage (Drive/Dropbox)
- Add dates to filenames
- Keep simple notes on changes
Sharing with Others
- Export your working profile
- Post on GitHub/Reddit/forums
- Add notes, photos, and printer details
- Help the community and learn from feedback
Best Practices
For Beginners
- Use pre-made profiles when available
- Start with a 0.4 mm nozzle and PLA
- Run calibration prints
- Change one thing at a time and document results
For Advanced Users
- Create profiles per material
- Fine-tune for special models
- Share profiles with the community
For Multiple Printers
- Use clear profile names (e.g., Voron 2.4 – 0.4 – ABS)
- Standardize core settings across similar machines
- Keep backups organized and note differences
Conclusion
Choosing the correct printer profile in Orca Slicer is the foundation of successful 3D printing. Use built-in presets when available, create custom profiles for unique machines, and leverage the Device Tab (and Obico) for smooth network and remote printing. Back up your configs, run quick calibrations, and keep learning from the community. With the right setup, you’ll spend less time troubleshooting and more time saying, “Wow, that looks awesome!”

![12 Best Orca Slicer Alternatives in 2026 [Free & Paid Options] 5 12 Best Orca Slicer Alternatives in 2026 [Free & Paid Options]](https://orcaslicer3d.com/wp-content/uploads/2025/09/Best-Orca-Slicer-Alternatives-768x431.jpeg)
