Material and Filament Settings in OrcaSlicer
3D printing materials behave differently depending on their type, temperature, and density.
With Orca Slicer, you can fine-tune these parameters to ensure your printer creates accurate, strong, and high-quality prints — whether you’re using filament or pellets.
🎛️ Overview of Material and Filament Settings
Each filament has unique properties such as melting temperature, cooling speed, and flow behavior.
In OrcaSlicer, these parameters can be adjusted under Material Settings to perfectly match your selected material.
By fine-tuning temperature, flow rate, and fan speed, you can achieve smoother surfaces and better layer adhesion.
Example Recommended Settings:
- PLA: 200 °C nozzle / 60 °C bed
- PETG: 240 °C nozzle / 75 °C bed
- ABS: 250 °C nozzle / 100 °C bed
OrcaSlicer’s intelligent calibration system automatically suggests the best settings for most popular materials.
🎨 Single-Extruder Multi-Material Printing
Single-extruder multi-material printing lets you use more than one filament on a single nozzle.
It’s ideal for multi-color models or combining flexible and rigid materials in the same part.
While the process is based on PrusaSlicer, OrcaSlicer adds extra configuration tools for smoother performance and cleaner transitions.
🔹 How Multi-Material Printing Works
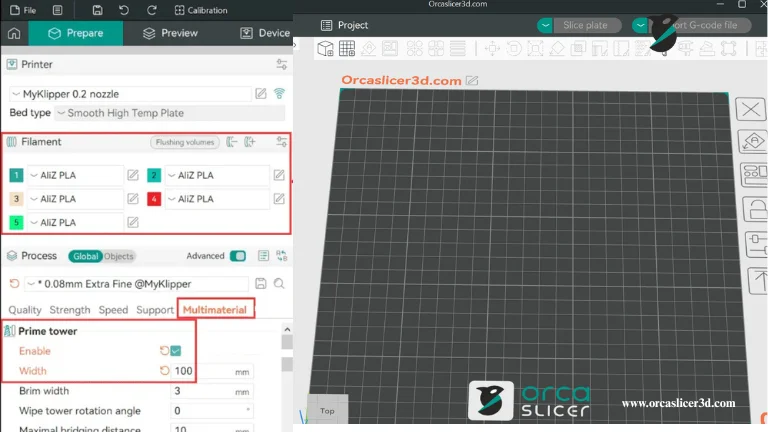
- Go to Material Settings → Multimaterial.
- Add as many filaments as needed.
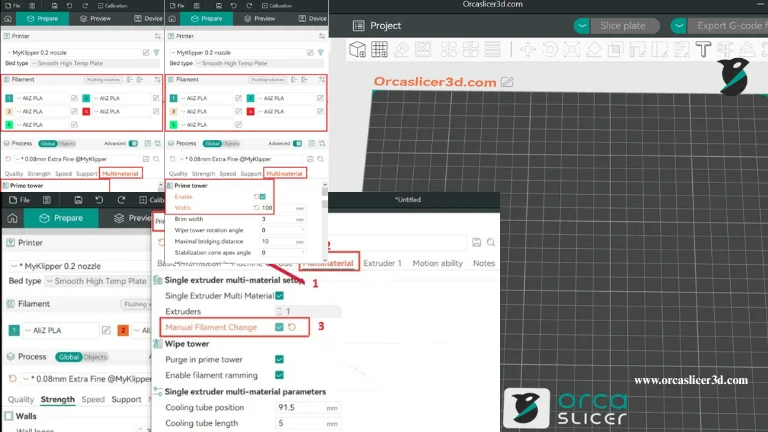
- Enable Prime Tower, set its width, shape, and rotation angle.
- Adjust purge and wipe parameters under Advanced Settings for seamless transitions.
🧱 Prime Tower Setup and Optimization
The Prime Tower is a small structure printed beside your model to purge leftover filament during material changes.
It prevents color contamination and oozing, ensuring clean results.
⚙️ Key Prime Tower Settings
- Size & Shape: Controls how much filament is used during purging.
- Wipe Tower Rotation Angle: Adds rotation per layer for better tower stability.
- Brim & Stabilization Cone Angle: Prevents collapse in tall prints.
- Purge Line Length: Defines how much filament is extruded during color changes.
💡 Tip: Proper prime tower calibration improves the top-layer surface and prevents unwanted color blending.
⚙️ Manual Filament Change in OrcaSlicer
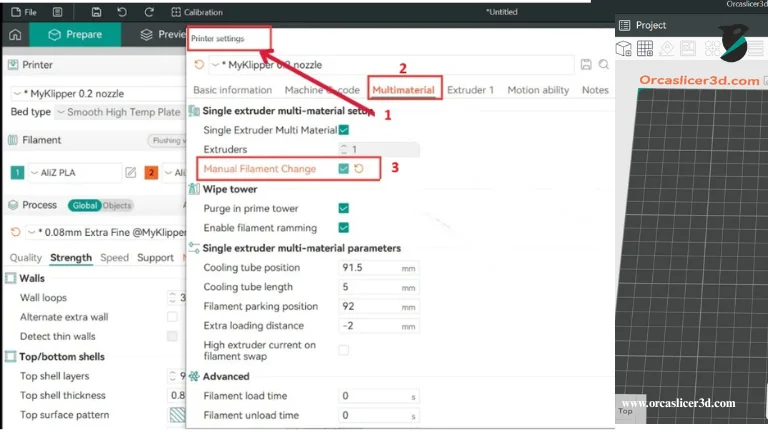
If your printer doesn’t support automatic filament swaps, OrcaSlicer’s Manual Filament Change feature helps you pause at a specific layer and switch materials by hand.
🔧 How to Enable Manual Filament Change
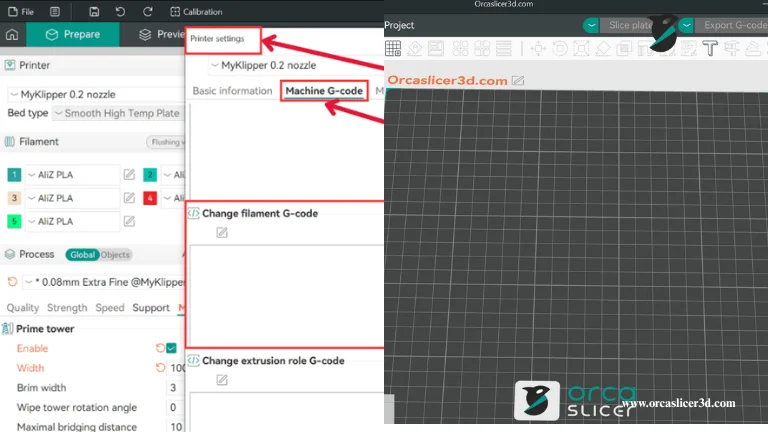
- Open Printer Settings → G-Code Machine.
- Locate Change Filament G-Code.
- For Marlin, use command
M600.
For Klipper, enterPAUSEor your custom macro. - Enable Manual Filament Change in Multimaterial settings.
This is perfect for hobbyists wanting to experiment with colors without dual extruders.
🚀 Ramming (Automatic Priming)
Ramming ensures that new filament fully replaces the old material before printing resumes.
It controls extrusion speed, distance, and temperature ramping for optimal flow.
In OrcaSlicer v2.3.0 and newer, ramming is handled automatically — manual adjustment is optional unless you want precise control during purging.
🧪 Pellet Printers and the Flow Coefficient
Large-format 3D printers (with print volumes ≥ 1 m³) often use pellets instead of filament.
For these, OrcaSlicer introduces the Pellet Flow Coefficient parameter.
🔍 What Is the Pellet Flow Coefficient?
Unlike filament printers that use diameter to calculate extrusion volume, pellet systems use a flow coefficient — a measure of how densely pellets pack inside the feeder.
Higher packing density → higher flow coefficient → more material extruded per rotation
Depends on:
- Pellet shape
- Material type and density
- Feeding mechanism and gear ratio
📘 Referenced Formula
[
\text{filament_diameter} = \sqrt{\frac{4 × \text{pellet_flow_coefficient}}{π}}
]
This converts pellet flow data into an equivalent filament diameter so OrcaSlicer can calculate extrusion just like FDM printing.
💡 Tip: Derive your own coefficient experimentally by printing small test pieces and measuring output.
🧱 Ooze Prevention and Flush Options
OrcaSlicer includes Ooze Prevention and Flush Before Print features for cleaner color transitions:
- Ooze Prevention: Lowers idle nozzle temperature between material swaps.
- Flush Before Print: Purges the nozzle when changing from dark to light filaments.
These minimize contamination and help achieve professional multi-color results.
🧰 Advanced Multi-Material Settings
For advanced users, OrcaSlicer provides fine control over:
- Ramming speed and volume
- Purge flow and color mixing ratio
- Fan speed transitions
- Temperature ramping between materials
These advanced tools ensure consistent transitions and professional multi-material performance.
🧵 Summary Table
| Feature | Purpose | Benefit |
|---|---|---|
| Prime Tower | Removes old filament during swaps | Cleaner color transitions |
| Manual Filament Change | Allows manual filament replacement | Multi-color prints without MMU |
| Ramming Control | Ensures stable extrusion | Reduces under-extrusion |
| Pellet Flow Coefficient | For large-format pellet printers | Accurate extrusion volume |
| Ooze Prevention & Flush | Cleans nozzle between colors | Prevents color contamination |

